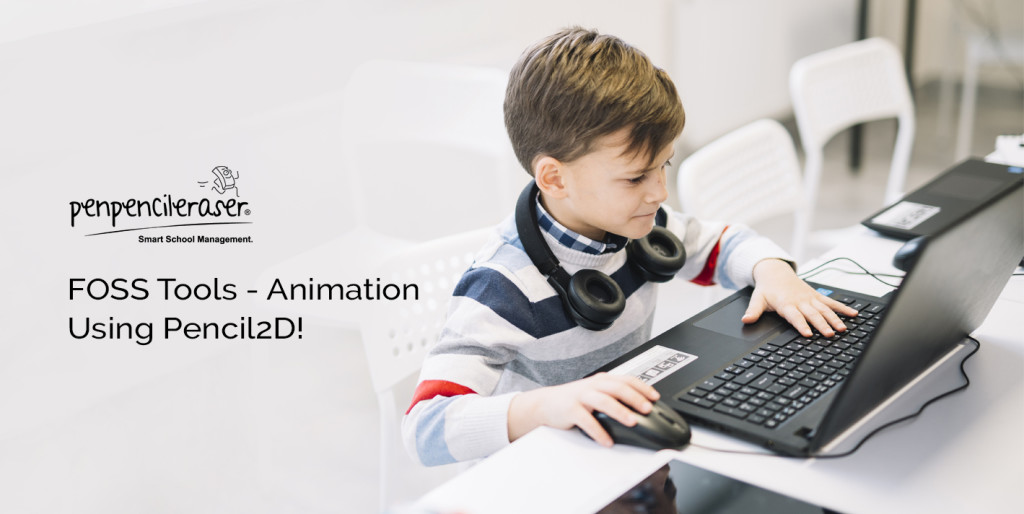
FOSS Tools - Animation using Pencil2D

2d

Introduction:

Creating 2D Animation using free and Opensource tool is a rewarding skill for those who wish to become Graphic Designer or a Digital Artist, especially the investment is only a computer and an operating system of your choice and the software part is completely free. With the Free and Open Source Software(FOSS) Movement, great number of software have been developed by communities,  and are given to people at no cost.  And in this post I would like to introduce Pencil 2D, which is simple and easy to use 2D animation tool.

Pencil 2D:

Pencil 2D is a free 2D animation software, aimed at beginners. It has a very small learning curve, so it is ideal for any beginner. Where the user only focuses on the design part, rather than worrying about implementation.

Interface:

GetImage

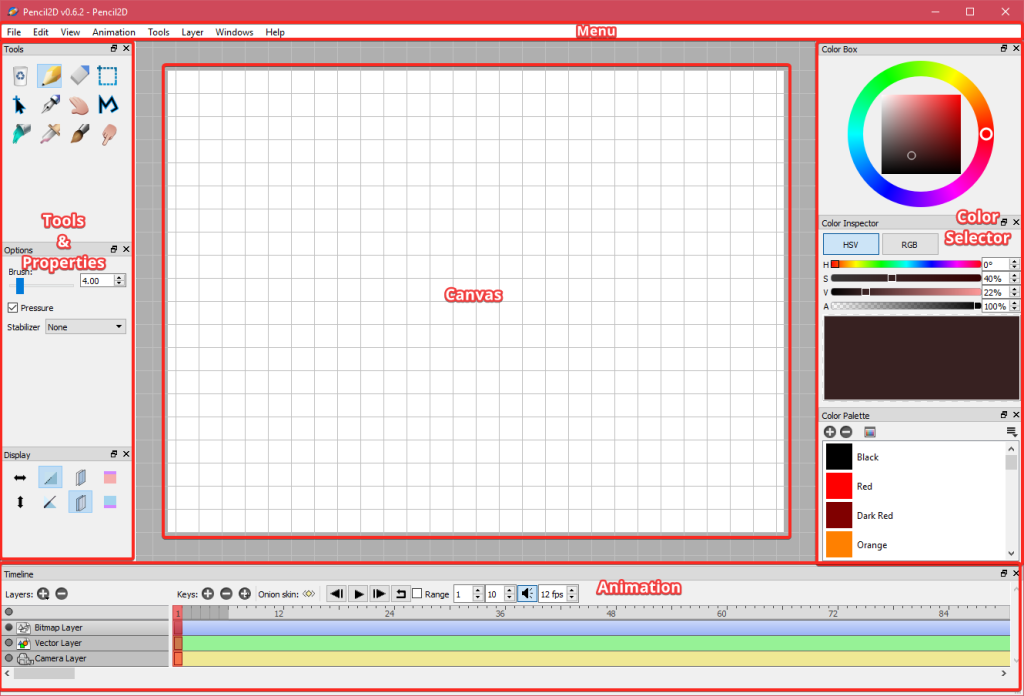
Pencil 2D’s interface is broken down into 5 main areas. The main area we focus on are the canvas area where we define the animation stage, and the Timeline section where we define the animation.

  1. Menu contains the usual options
  2. Canvas is the part that is going to be focused by the camera. And entire area surrounding the canvas is the stage.
  3. Tools & Properties is where we select the tools and set its properties, like when we select brush, we get to set its property of brush size to be higher or lower using the property section.
  4. Color Selector in this section, there is the color wheel, along with manual color setting option and a color palette. Which will aid in selecting and blending colors.
  5. Animation section is where we bring instruct when the object in the canvas area be articulating. Remember Pencil 2d is used for only simple Timeline or Key-Frame Animation.
Tutorial: Back to School Greetings

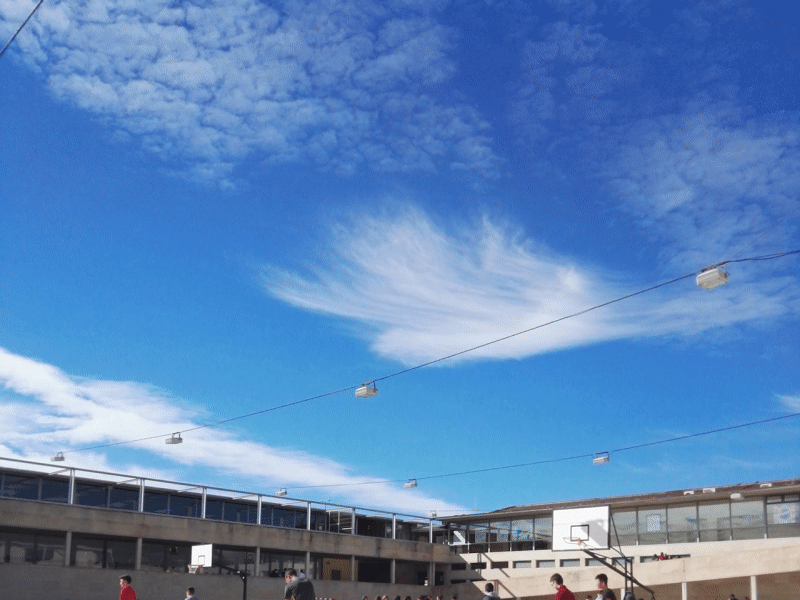
Here we are going to create a simple Back-to-School sliding animation. The resource file are available as zip format, having the source image and generated GIF in the link

Step 1: Open Pencil2D and import image using  file > import >image.


1-import


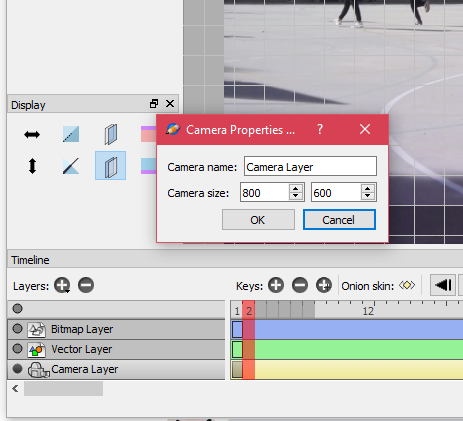
Step 2: In order to resize the canvas/stage size, double click the camera layer . Enter the size of height and width in pixel unit. 


3.Resize canvas


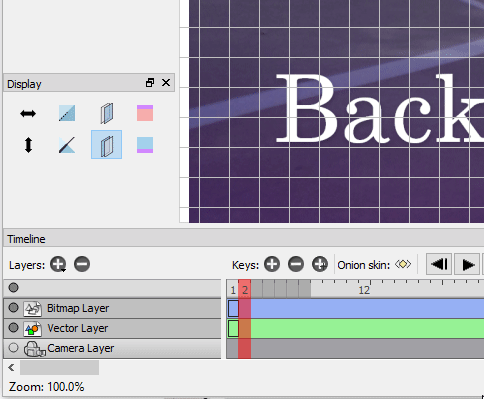
Step 3: In order to arrange the image on screen select the camera layer, and in the tools section select hand tool. Now cursor turns to hand symbol, place it on the image and drag. 


3.fixing image


Step 4: In order to animate using timeline, in the camera layer  timeline, select the 30th frame and add frame using the [+]keys located in timeline window to create a new frame.

Step 5: Select the image and drag it to a different part of the camera area(Refer the gif).


4.creating tieline


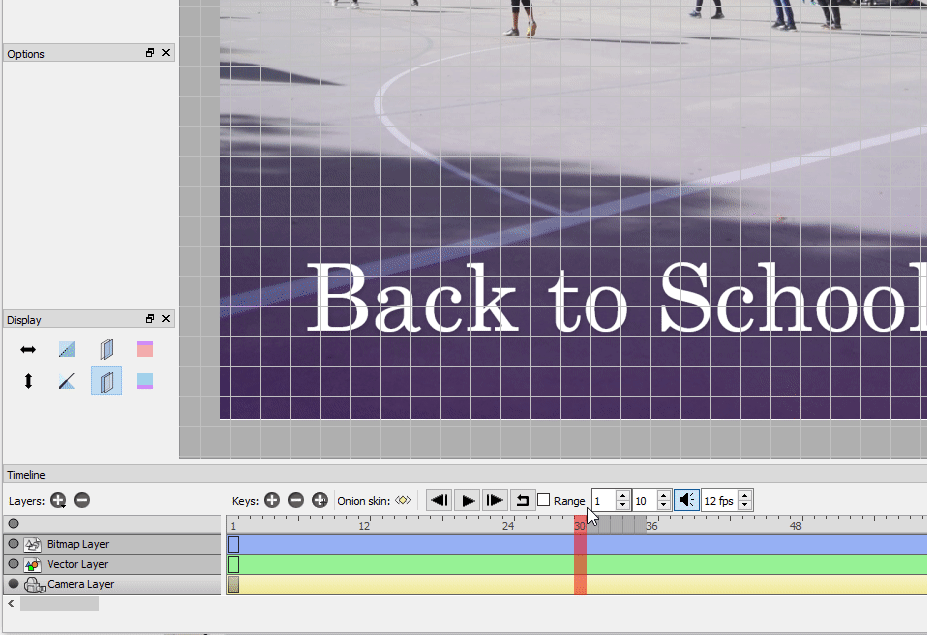
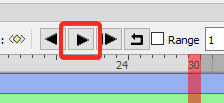
Step 6: In order to preview the animation, press the play button in the timeline section. 


5.Preview


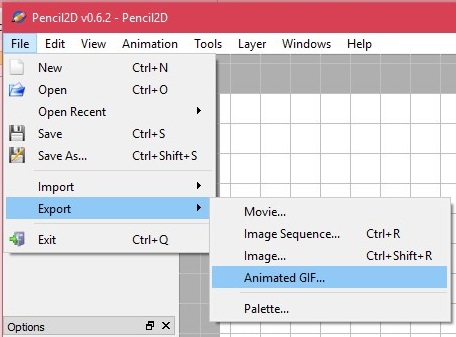
Step 7: This is the final step where we export the image to either GIF, Video, Sequence Images. Go to file>export>animated GIF(we used GIF format in order to be used in Web).  


6.Export


Output:

output

Further Reading:

Pencil 2D is a simple tool with a lot of potential, and is best suited for introducing students, beginners not only to Computer Graphics & Animation but also to FOSS and its importance. In this short and simple tutorial only the basics are covered. And the advance part is omitted since it is out of scope of this tutorial, where the importance are given to the introduction of Pencil 2D and animation concepts. For further information regarding the terminologies and advanced concepts please refer the below sites for information.

Links:
  1. https://www.pencil2d.org
  2. https://www.adobe.com/devnet/flash/learning_guide/animation/part03.html
  3. https://www.adobe.com/devnet/archive/flash/articles/concept_tween.html

Web Development Using Chrome Extensions For Smart Schools!

browser-based

In this post, I will introduce the readers to web development extensions tools in chrome browser, which assist in your web development. Weather it is development or practices these quick tools will help you get going in no time. And the best part is there is no complex installs and setups are involved. Everything is done inside the browser ecosystem and is best suited for school labs and introductory summer camps and boot camps.

Goto Google Chrome extension https://chrome.google.com/webstore/category/extensions, which google chromes own distribution medium for an extension. And other 3rd party extensions are not allowed to be downloaded and used since it will cause privacy and security issue. Other than chrome distributed extensions, we can run local development extensions for testing our own extensions, which are developed and later uploaded to chrome extensions website.

Without further ado let’s look at how to install chrome extensions.

  1. The first step in order to access the google extensions, we have to log in with our Google account credentials.
  2. Goto https://chrome.google.com/webstore/category/extensions, and selected the search bar which is located in the upper left corner.
  3. And in the upper left corner, there is a search bar, it has the support for Google search suggestion
  4. Now search for the extension we are looking for. Which usually displayed on the right side of the page


1

Web Maker:

The first and important extension we are going to look at is Web Maker. This is basically a code editor with features. And the main advantages are the ease of editing HTML, CSS, and Js on the same page using split windowed areas and save and load option for later updates and changes. The output screen is to the right by default. We can take screenshots, export our source code and also download our source code for offline integration. And the best part is that we can use this extension offline.

Features:

  1. Fast loading, with save features
  2. Auto code completion
  3. Supports multi stylesheet (CSS, LESS, SASS, SCSS, Stylus) and script (JavaScript, Coffee script, Typescript, ES6) formats.
  4. Able to run in offline mode.
  5. Support for screenshot image and source code exporting


2

Color Zilla:

Color Zilla as the name suggests is primarily used for picking colors from the page. And is one of the important tool for the web development. It features a color picker, color mixer, pallet browser and CSS color gradient generator.

Features:

  1. Clean interface, does what it says.
  2. Does not take much space or resource.
  3. Does not need an internet connection.

3

Page Ruler:

Page Ruler application is a screen pixel ruler calculator, used for calculating the width and height of a rectangular area in pixels. It’s simple and elegant interface makes it easy to be used while developing from design (Note: Design-files are given as image files, where developer uses these tools to calculate the height and width between each element). It got width and height assistive tool, where we randomly draw a rectangle grid using the tool. And with the help of the assistive tool which is small squares on the four ends of the main rectangle, we arrange the X and Y coordinate square grid for our required area.

Features:

  1. Easy and simple interface
  2. Assistive tool for precise placement of the grid calculation box


4

Chrome Web Debugger:

Chrome Web debugger is an advanced debugging tool, and it features CSS editor, various viewpoints renderer, debugging for media content and a whole bunch of other advanced tools. This tool is bundled with google chrome by default.  And can be accessed by pressing F12 button or, by right-clicking and selecting inspect option.


5

Final thought:

Jumpstarting HTML and CSS development for a novice seems to be a lot of work, and using these tools make the workflow easier to a certain extent. Which assist us in the practicing the code and get ourselves familiar, but on longer-run and on real development an IDE is a preferred approach where certain complexities do exist. Whatever the scenario, maybe it development or practice in the school lab, the final word is Practice! Practice! Practice!

STEM Education, The learning Revolution – An Explanation with Examples!

STEM
STEM-based education or curriculum is popular and gaining momentum among the education and academic communities across the globe in the recent years. So let us explore what is special about them, and are they new in the education communities and systems?

Well, the answer is yes and no, if we look closely at the acronym of STEM, we get Science, Technology, Engineering, and Mathematics. We define STEM, as a way of educating and creating exposure in children to the world of STEM-related fields (Science, Technology, Engineering) with real-world problem-solution scenarios, and not just by the conventional theory-and-experiment education followed in schools worldwide.

If we see the existence of the STEM, the answer will be, it is one of a kind. Something new that is dictated by the time and era we live in. If we look closely at the education, it is used as a means of educating and creating exposure to the student to a more sustaining education.

Where the science and technology are at its height, innovation pops up every second, by this way the student gets ample exposure and abundant opportunity to explore the various fields in STEM and are likely motivated to pursue the STEM-based profession.

Inevitability of STEM Education

The main necessity for the STEM education is preparing the student for a sustaining career, with respect to time and current trend. As mentioned earlier STEM education is one of the kinds which is dictated by time and era.

If we look at the Renaissance era, the importance is given to art and literature, where the printing press first emerged, here the growth of the art and architecture excelled. When we consider the era of 40’s and end of 50’s we could see the development of system/curriculum for education framed, and here the Knitting for girls and the carpentry for the boys existed.

Then followed by workshop classes, focusing on mechanical skills, this followed by the computer era, where the home-brew computers emerged. Here the computer literacy co-existed, which it is the basic for a sustaining career then and now, in due course, it became a part of the curriculum since computers are playing a crucial part in our lives.

How to Incorporate STEM

STEM Education

As the recent study and analysis of researchers showed the best method of incorporating STEM education into current curriculum should be done at the elementary level. It is always best to introduce them as generic as possible, rather than as separate STEM concepts. In this process, their creativity of examining, exploring things and finding solutions are seeded in their minds.

Again, if we take a closer look at introducing STEM, it is suggested that best time to introduce is at a preschool level, where they would be learning the skill of exploring things. Much like Hands-on Attractive Exploration! Where the mere imagination and hands are put to the labor in order to stack pebbles, will form a basic masonry craftsmanship.

Understanding the Scenarios

Fundamentally, the scenarios involved in STEM are in the first hand the problem needs to be identified and then the solution to be sorted out from the available possibilities. The solution must be thought of based on the economy, time-critical dependency, build challenge.

The execution will be the end process of the result that will mostly be of physical computing related solution in the academic community, since it helps in the exploring and interacting visually and will be easy to grasp.

Physical computing is a type of computing where the interactions performed by the computers are brought to reality, rather than being hypothetical. The sensing or the input are fed through buttons or sensor, then the actuator/output is in the form of interaction, such as articulation through light or sound or automation or computer/remote server input or the combination of all. The physical computing involves the use of some form of task-specific computer, like the micro-controller (Arduino/ NodeMCU) which are limited in processing power, or microprocessors (Beagle Bone/Raspberry Pi/Orange Pi) having dedicated processor and higher memory and capable of multitasking. The cost and the usability vary, based on the performance and speed.

Example 1:  Automated Pedal Bin

Situation: The pedal bin is a type of dustbin, with a normally closed lid. And has a pedal at the front bottom, which should be pressed to pivot the closed lid at the top. The encountered problem is that the opening and closing of the lid should be automated.

Solution: Investigation is conducted on the working of the pedal bin as a first step. The student studies the mechanical structure first and tries to come up with a semi-permanent solution. The students would then seek a mechanical actuator which is controlled by electronics. The electronics can be replaced by single chip computers since they are designed for doing a single task and in order to avoid the complexity of circuit design. With this, the working of the pedal bin is been semi-automated.

To make it fully automated, a sensor is required to sense the environment and based on the reading by the sensor, the computer makes the decision to activate the actuator or not. The sensor can range from cheap IR sensor to full-scale industrial precision sensor. Now, the usage of such sensors is planned based on the economy and complexity and lastly precision.

Example 2:  Plant Watering System

Situation: Now we hop into a little more complex problem of ‘Automated Plant Watering System’. Here the problem is plant growing medium require manual watering which should be automated.

Solution: The setup is focused on simplicity and academic viewpoint. Here the first thing to know is the soil moisture. The soil moisture should be the determinant of the level of water content. The precision is based on the cost and processing power. For the academic purpose, we stick to moisture resistance sensor, where the output is given as voltage. Here the student is made to take field tests on soil moisture at which the coded logic for the automatic watering unit should be activated. The soil moisture gives output in terms of voltage, the 5V output for the presence high moisture content followed by 0v for low moisture content.

So, it is gets simplified as the computer is programmed to listen for input from the moisture sensor and when certain moisture data condition is met, it activates the dc motor pump which waters the plant up to certain time as the constraints are met.

The real and practical exposure is encouraged in the STEM learning and proves to be the best curriculum for the overall development of the child.